How to Use an Image Compressor: A Complete Guide
High-quality images can drastically improve user experience on websites, blogs, or social media. However, large image files can slow down your website, increase load times, and negatively affect SEO performance. This is where an Image Compressor becomes a vital tool. In this article, you’ll learn how to use an image compressor effectively, the benefits it offers, and why compressing images is essential for both performance and SEO.
Table of Contents
What Is an Image Compressor?
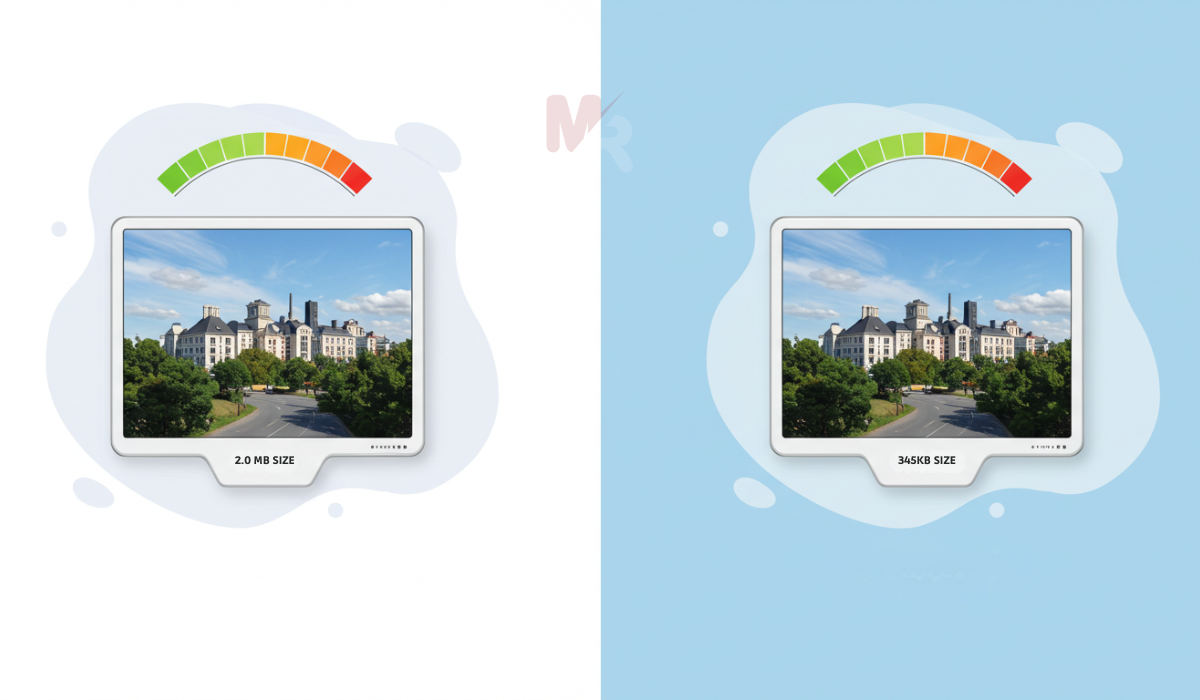
An Image Compressor is a tool that reduces the file size of an image without significantly compromising its quality. It works by eliminating unnecessary data, adjusting image resolution, or using advanced compression algorithms like lossy or lossless techniques. Whether you’re a web developer, blogger, marketer, or everyday user, an image compressor can help you optimize images for faster loading and better user experience.
Why Should You Use an Image Compressor?
Using an image compressor is essential for various reasons, particularly if you’re managing a website or digital content. Here are the main benefits:
1. Faster Page Load Speeds
Compressed images load much faster, which improves user experience and reduces bounce rates.
2. Improved SEO Performance
Search engines prioritize websites that load quickly. Using an image compressor helps your site rank higher by minimizing load times.
3. Reduced Bandwidth Usage
Smaller image files consume less bandwidth, which is particularly useful for mobile users and server load management.
4. Better Storage Efficiency
An image compressor reduces storage requirements, allowing you to host more content with the same resources.
5. Improved Email and Sharing Capabilities
Smaller images are easier to attach to emails and upload to social media or cloud platforms.
Types of Image Compression
Understanding the types of compression can help you choose the right method for your needs.
Lossy Compression
Lossy compression reduces file size by permanently removing some image data. While this may slightly degrade image quality, it significantly reduces file size and is ideal for web use.
Lossless Compression
Lossless compression reduces image size without losing any data or quality. This is ideal for images that need to retain original quality, such as professional photographs or medical images.
How to Use an Image Compressor (Step-by-Step Guide)
Using an image compressor is simple and doesn’t require any technical expertise. Here’s how you can do it in just a few steps:
Step 1: Choose an Image Compressor Tool
Select a reliable image compressor. There are many online tools such as TinyPNG, CompressJPEG, or dedicated apps like RIOT or ImageOptim.
Step 2: Upload Your Image
Click on the “Upload” or “Drag and Drop” section of the tool. Select the image file(s) from your device that you wish to compress.
Step 3: Choose Compression Settings
Most image compressors offer options like:
- Compression level (low, medium, high)
- Output format (JPG, PNG, WebP)
- Image resizing options (optional)
Adjust these settings according to your needs. For web images, a medium to high compression level often works best.
Step 4: Compress the Image
Click the “Compress” button. The tool will process your image using the selected settings and provide a preview or download link.
Step 5: Download the Compressed Image
After compression, download the optimized image file. You can now use it on your website, blog, or email without worrying about file size.
Best Practices for Using an Image Compressor
To make the most of your image compression efforts, follow these best practices:
Optimize Before Upload
Always compress your images before uploading them to your website or CMS. This ensures your content is optimized from the start.
Choose the Right Format
Use JPEG for photographs and PNG for transparent graphics. WebP is also a modern, efficient format supported by most browsers.
Maintain Balance Between Size and Quality
Test different compression levels to find the best balance. Avoid compressing too much, which may result in blurry or pixelated images.
Use Responsive Images
Make sure your images are sized correctly for different screen resolutions. Combine image compression with responsive design techniques for best results.
Common Mistakes to Avoid When Using an Image Compressor
Even though using an image compressor is easy, avoid these common mistakes:
Overcompressing Images
Too much compression can lead to poor image quality, which can harm user engagement and brand perception.
Not Backing Up Originals
Always keep the original high-resolution version of your images before compressing. You might need them for print or future editing.
Using the Wrong Format
Using PNG for complex photos or JPEG for transparent logos can result in unnecessarily large files or poor rendering.
SEO Advantages of Using an Image Compressor
Search engines like Google reward websites that provide a fast and seamless user experience. Here’s how using an image compressor contributes to SEO:
- Faster Load Time: This leads to better rankings on search engine result pages (SERPs).
- Lower Bounce Rate: Users are more likely to stay on a fast-loading site.
- Mobile Optimization: Compressed images load faster on slower mobile networks, improving mobile SEO.
- Higher PageSpeed Insights Score: Google’s tools measure performance, and image optimization plays a crucial role.
Frequently Asked Questions (FAQs)
Q1: Will compressing images affect quality?
Yes, but only if you’re using lossy compression at high levels. Most tools strike a balance between size and quality, so the difference is often negligible.
Q2: Can I compress multiple images at once?
Yes. Many image compressor tools offer bulk or batch compression features.
Q3: Is it safe to use online image compressors?
Most reputable tools are safe and do not store your files permanently. Still, avoid uploading sensitive images to online platforms.
Q4: Should I compress every image?
Ideally, yes. Compress all images used on websites, blogs, newsletters, or social media to ensure fast performance and low bandwidth usage.
Conclusion
An image compressor is one of the most effective tools for improving your website’s performance and user experience. By reducing image file sizes, you can speed up page load times, enhance SEO rankings, save bandwidth, and keep your digital content streamlined. Whether you’re a blogger, developer, marketer, or everyday user, learning how to use an image compressor properly is a smart step toward professional and efficient digital publishing.
Start compressing your images today and experience the benefits of optimized visuals across your digital platforms!